Everyone who knows me, also knows that I’m a huge whisky fan. In this post, I will blend two of my favourite things – whisky and programming, into an app that will detect the type of whisky, just by taking a picture of it. This might be useful if you have a whisky club that collects different types of whisky and you are not sure if you have that particular whisky in your collection.

For this, I will be using Apple’s machine learning framework Core ML and IBM Watson services, which recently have teamed up together, in order to make machine learning a more accessible asset to iOS developers.
How the app works
Training the model
First, we need to create a Core ML model, that will do the whisky detection of the taken images. For this, we will be using Watson Studio, from the IBM data platform. To create an account, follow this link. You need to do standard registration, with email confirmation. If you are struggling with the registration, check this great tutorial from raywenderlich.com.
After you have successfully completed the process, go to the IBM data platform, and create a new project. Let’s call ours the WhiskyRecognizer. Make sure your project supports the visual recognition functionality, which is what we need to do the whisky detection.

After your project is created, you will be shown the page for creating the visual recognition model. Here you will perform the training of the model, suitable to the requirements of your app. In our case, we will be training it with different brands of whisky.

IBM Watson services expects the data in zipped folders, which contain images used in the classification. The names of the folders correspond to the classes of visual classification, that the model will support. Every folder needs to have at least 10 images of the given class, in order for it to be able to be trained. You should take pictures of your objects from different angles and under different light/environment – this will help in more accurate predictions.

Our app will support around 50 whiskies (that’s how much we currently have in our Whisky Club collection). When I was training the data set, I’ve taken pictures of our (empty) whisky bottles, from different angles. I’ve also downloaded several images online, to have as many examples as possible. You can find the testing set in the git repo and feel free to extend it with more images and different brands of whisky.
Upload the zip files on the right part of the model page, select them, press the three dots and press the button “Add selected to model”.
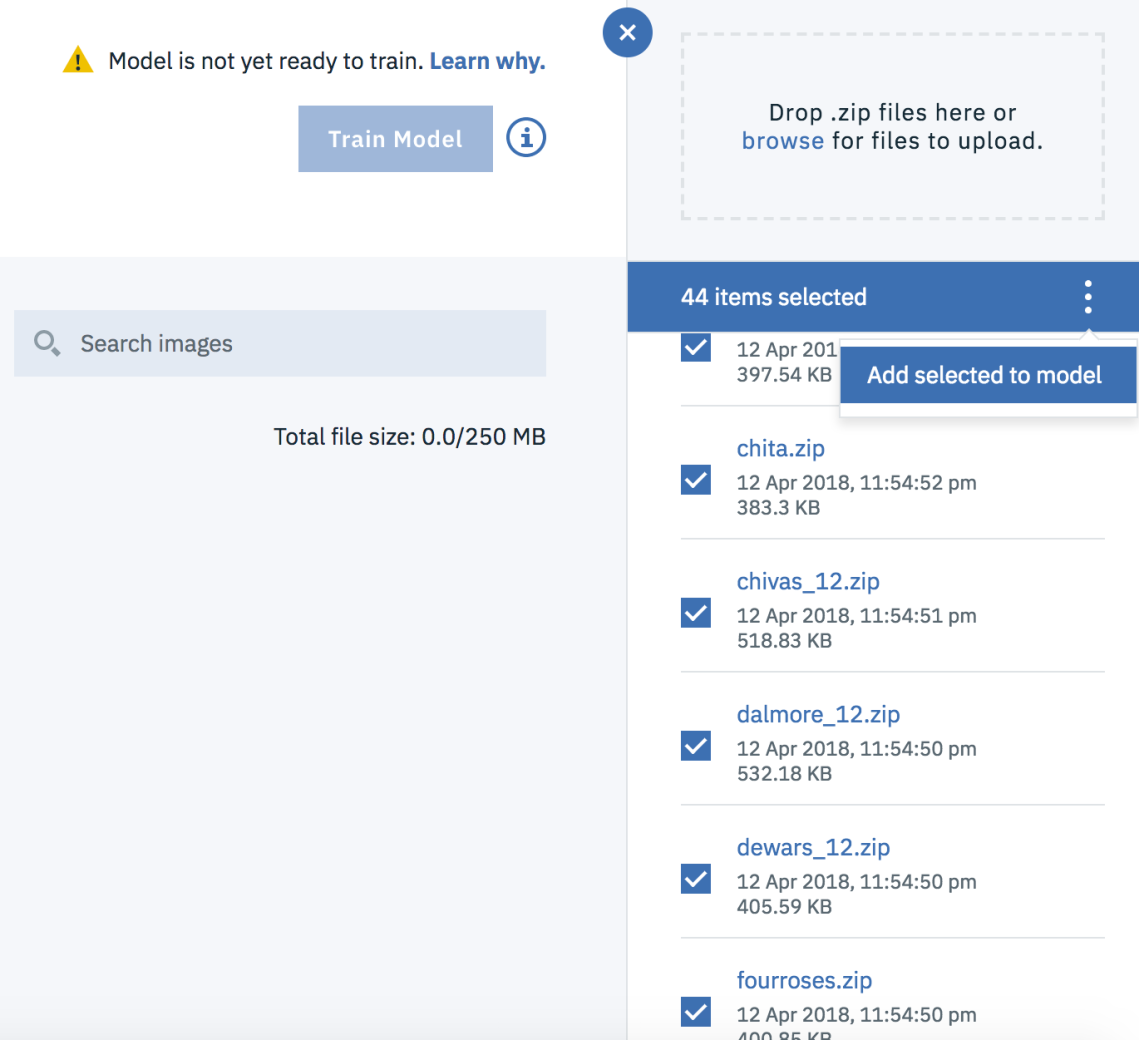
This will automatically create different classes for the zip files we have provided. Those would be the supported whisky brands. Later, if you want to add new brands, you can do that easily by uploading another zip file with different name. When everything is uploaded, if there are no errors with the uploaded data (e.g. invalid image, not enough images etc), you can start the training of the model. After around a minute or less, the model should be trained. In the meantime, take some time to show some appreciation to the beautiful whisky bottles.

When the training finishes, you can download a generated Core ML model, which as discussed in my other machine learning post, is very easy to be integrated into an iOS app.
Before we switch to the iOS implementation, just grab your Watson app id, you will need it for the app. To do this, go to Settings -> Apps and Services.

Select the “Visual Recognition” Service, called watson_vision_combined_dsx. This will open a page which contains the api key in a JSON file.

That’s everything we needed to do on the IBM Watson Service. Now, let’s switch to the iOS app.
iOS Implementation
Create a Single View iOS app and call it WhiskyClub. First, add a permission for the camera in the Info.plist file.

The user interface of the app will be pretty simple – a button for displaying the camera or the photo album, an image view which will display the taken image, as well as a label which will show the name of the detected whisky. Additionally, we will add a button to update the model from the app. This will be useful if we want to add a new whisky brand and make it immediately available in the running app.

Next, let’s add the Watson Swift SDK to our project. The SDK is available via Carthage, so create a Cartfile, with the following content:
github “watson-developer-cloud/swift-sdk”
Now, from your terminal, where the Cartfile is located, run the following command:
carthage bootstrap –platform iOS
This will create the VisualRecognitionV3 framework in the Carthage folder. Drag and drop it in your project, like a standard framework integration.
We can finally start adding some code. First, in the ViewController, define some variables which will be needed for the setup of the model.

Update the values with your api key and classifier id. The classifier id is the name of the generated Core ML model that you have downloaded from the IBM Watson website. The VisualRecognition class will be in charge of making the actual predictions of the whiskies. It is created with the api key and the version of the services.
In the viewDidAppear method, we will try to load the model. We will first check whether we have one currently locally. If we don’t we will download it from the Watson API.

The update of the model is done with the help of the VisualRecognition class, you only need to specify the classifier id.

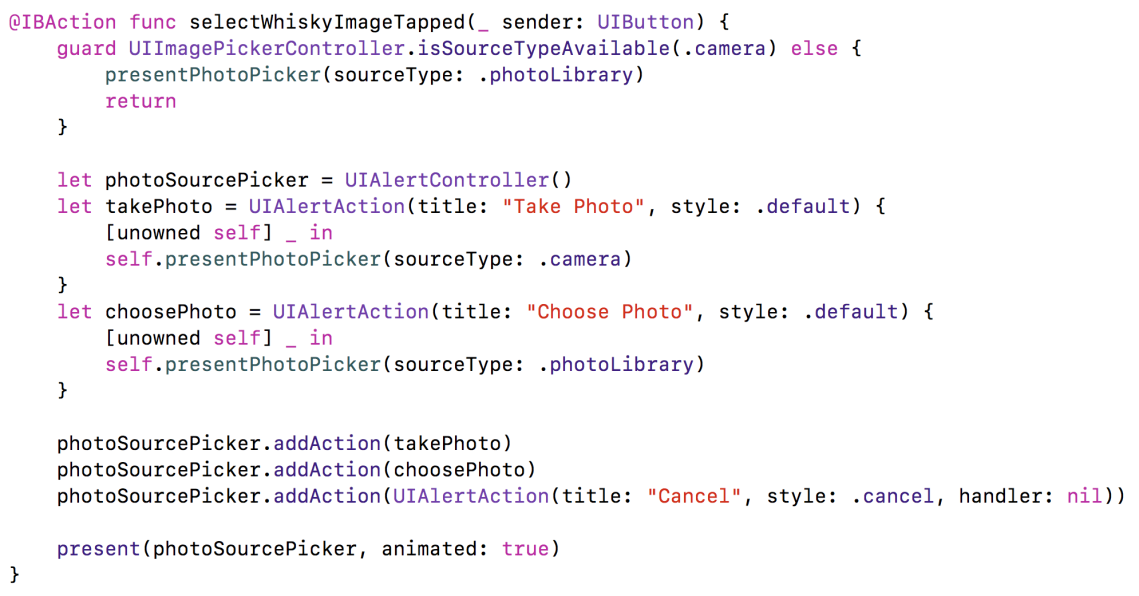
Next, let’s add an IBAction for the select whisky button – this will open up the action sheet for selecting an image from the photo library or with the camera.
When an image is picked by the user, we are displaying it in the image view and we start the classification.

The most important method here is of course the classifyImage. Let’s dive deep into it.

The method takes the image the user has provided, as well as a threshold. The threshold determines what would be the minimal score the images need to have in order for them to be retrieved from the classifier. We are putting 0.51 here, because we want to be over 50% sure that this is indeed the correct whisky. If we don’t have such whisky, we are falling gracefully with the following message:
Unrecognized whisky. Are you sure it’s not Cognac?
The classification is done by the VisualRecognition class that we have defined in the beginning. Apart from the image, it also needs the classifier id, the threshold, as well as success and failure handlers.
The success callback returns a list of classified images. We are taking the first one (since it’s only one) and we try to get the first class of the classifier. That would hopefully be one of the zip folder names that we have uploaded to the IBM Service. But that’s a folder name, which is not very user friendly. We need some kind of mapping of the id of the class with a display name that can be shown to the user.
For this, let’s create a JSON file (whiskies.json in the sample project), which has such mapping.

We will also create a WhiskyService class, which will implement all the required things. The ViewController will only know about the one method which will return the whisky info for every type of whisky. Feel free to extend the JSON file with more info, such as tasting notes, country and so on.

When we get the whisky info, we are just displaying it in the label for the detected whisky.
And that’s everything we needed to do in order to recognize whisky brands. Let’s test it with my all-time favourite Lagavulin, 16 years old.

The successful detection needs to be celebrated with a glass of this smokey delight. Cheers!
Finishing thoughts
Core ML with IBM Watson Services is really powerful combination which makes machine learning a lot easier for iOS developers. The updating of the model after the app is shipped is also a great benefit, since you can add different products (whiskies in our case), based on what the users are entering. As you can see here, you don’t need to be a Data Scientist in order to create a solid model. Of course, this model is not perfect and if you take the picture from an angle which is not in your testing set, it might not recognize your whisky.
What do you think about Core ML and IBM Watson? Will you use it in your apps? Do you like whisky? Share in the comments section.
You can find the source code, the model and the training set on my GitHub page.
Other useful links
https://developer.apple.com/ibm/
https://www.raywenderlich.com/190191/ibm-watson-services-for-core-ml-tutorial
https://github.com/watson-developer-cloud/visual-recognition-coreml

Haha this is great. I’ve been noodling away on something similar in my spare time for a few months! You’ve done a great job.
LikeLike
thanks, I’m glad you like it!
LikeLike
This is really interesting! What is the use case and benefit by detecting the brand? Just curious..
LikeLike
Thanks! This particular use case is targeted at whisky lovers, to learn more about the different brands without searching on the internet.
But the much bigger picture behind it is image classification. The ability of the devices to classify images opens up a lot of possibilities like helping in health condition detection, gesture recognition, different kinds of filtering etc.
LikeLike