Introduction
Machine Learning allows computers to learn and make decisions without being explicitly programmed how to do that. This is accomplished by algorithms that iteratively learn from the data provided. It’s a very complex topic and an exciting field for researchers, data scientists and academia. However, lately, it’s starting to be a must know skill for good tech people in general. Apple is expecting us to catch up with these technologies, by announcing Core ML. Core ML is a brand new framework from Apple that enables integration of already trained learning models into the iOS apps. Developers can use trained models from popular deep learning frameworks, like Caffe, Keras, SKLearn, LibSVM and XgBoost. Using coremltools, provided by Apple, you can convert trained models from the frameworks above to iOS Core ML model, that can be easily integrated in the app. Then the predictions happen on the device, using both the GPU and CPU (depending on what’s more appropriate at the moment). This means, you don’t need internet connection and using an external web service to provide intelligence to your apps. Also, the predictions are pretty fast. It’s a pretty powerful framework, but with lot of restrictions, as we will see below.
Text recognizer
In this post, we will build an app that will take image as an input, and it will try to recognize which letters it contains. This might be very handy for developers that draw diagrams and text on a whiteboard. When they are done, they will not have to just take a picture of the drawing, they can scan it with our app and have the data in a machine-readable format. The process will be consisted of two steps – first we need to detect which of the objects in the image are letters (detection step). For this, we will use Apple’s Vision framework. Then, we need to figure out what are those letters (recognition step). In order to accomplish this, we will use a trained Core ML model.
Let’s see what we need to do in order to create a Core ML model and integrate it in an iOS application. The following figure illustrates this.
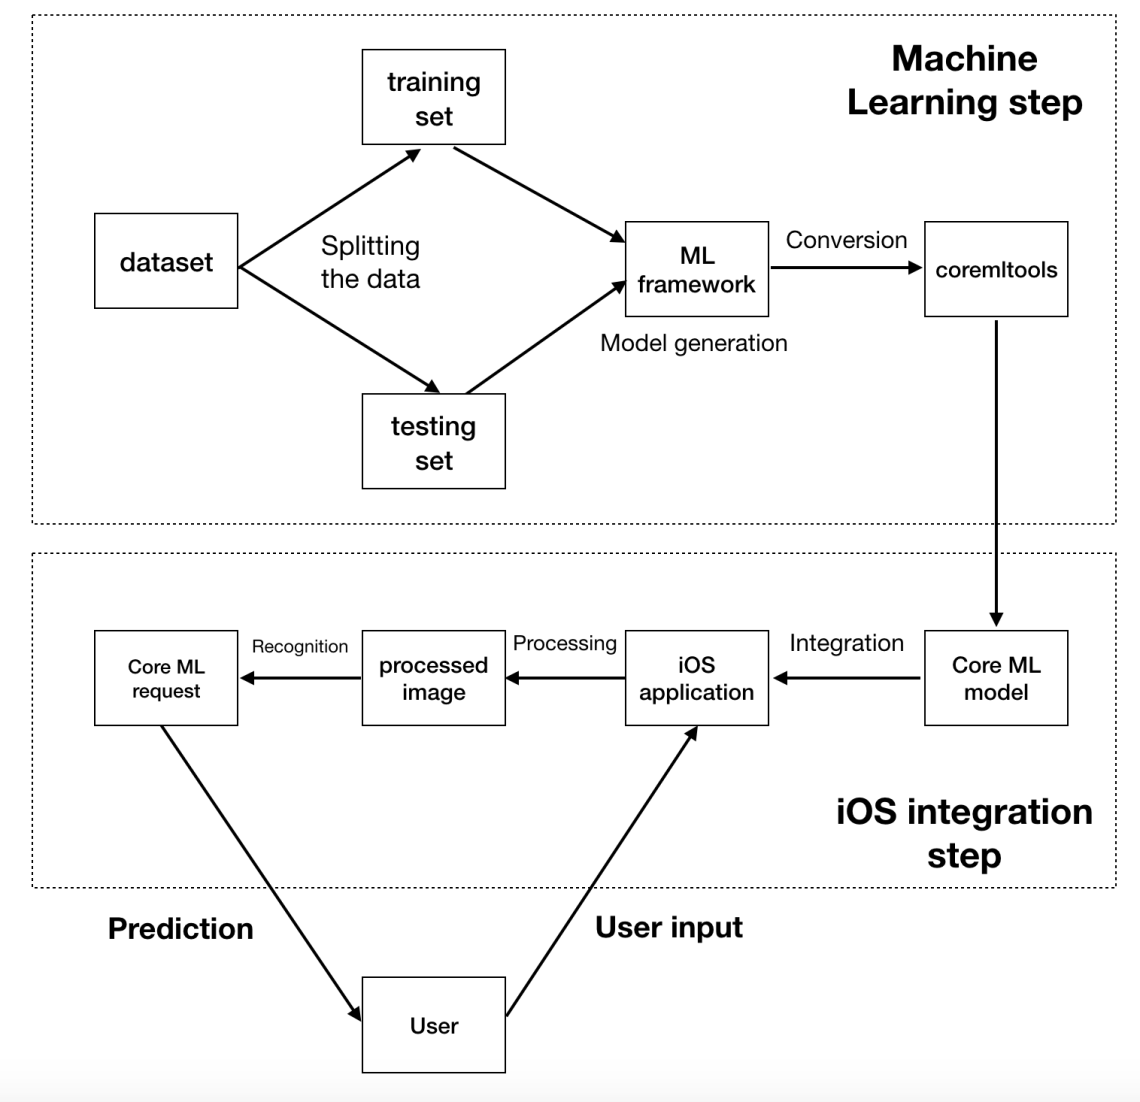
The implementation consists of two steps. The machine learning step is more suitable for a data scientist. Choosing the right dataset, implementing the right machine learning algorithm, fine tuning and changing the parameters requires a lot of expertise in this area. After the model is created in a machine learning framework, we need to convert it to Apple’s Core ML format. After we have the model, the second step, the iOS integration is where the developers step in. They can easily integrate the Core ML model and focus on what they do best, which is creating apps, utilizing the established mobile technologies and concepts.
Implementation
In our case, the users will provide a picture (either from the camera or from the photos album). The picture will be processed, split into smaller images that contain one letter each. Then, we will ask Core ML whether it can detect as letters the images we have provided. We will keep track of the position of those images, in order not to lose the ordering of the text and at the end, hopefully, we will have the recognized text.
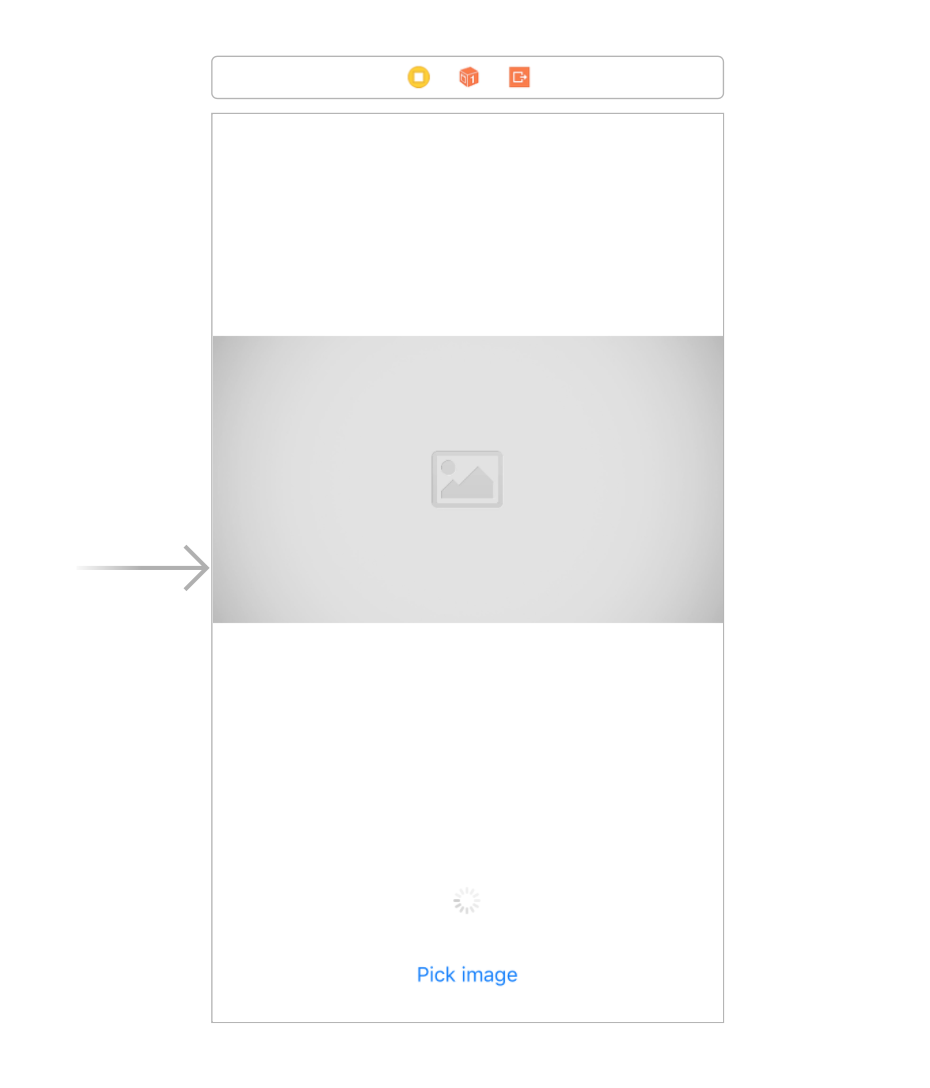
The User Interface of the app would be pretty simple – it will consist of a larger image view which will display the image, a label which will present the recognized text and a button which will allow us to pick an image.
We will use a convolutional neural network model, which is trained with a lot of grayscale images, with different fonts. The accuracy of the model with a testing set is approximately 86-90%. The model is converted to Core ML using Apple’s coremltools. Let’s include the model in the iOS application.
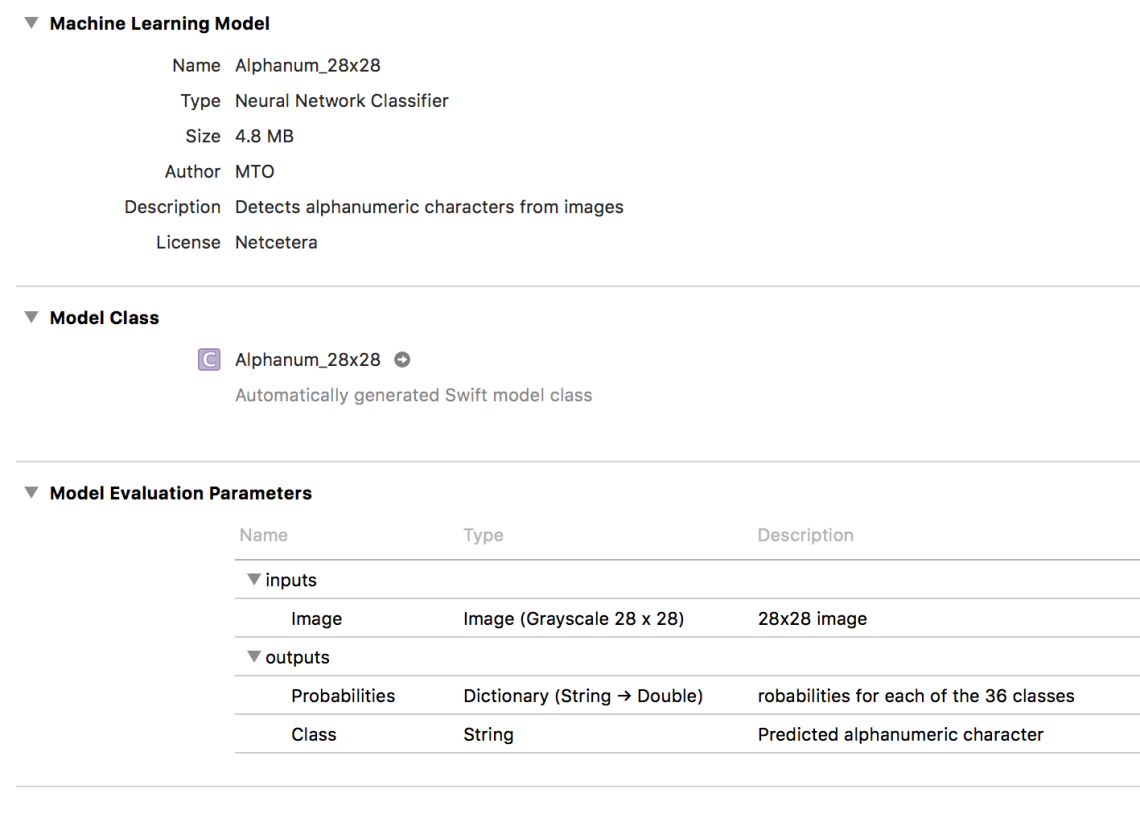
You can see some information about the model, like the name, type, size, author, description and license. In the model evaluation parameters section, you can see what the model expects as an input and what it returns as an output. In our case, it expect 28×28 grayscale image. It returns a dictionary of the probabilities (each letter or number as key and the probability that the character is the value we are looking for). It also return the Class, which is the alphanumeric character with the highest probability.
When we integrate the model in Xcode, an automatically generated Swift model class is available. We can use the class to load the model and make predictions.

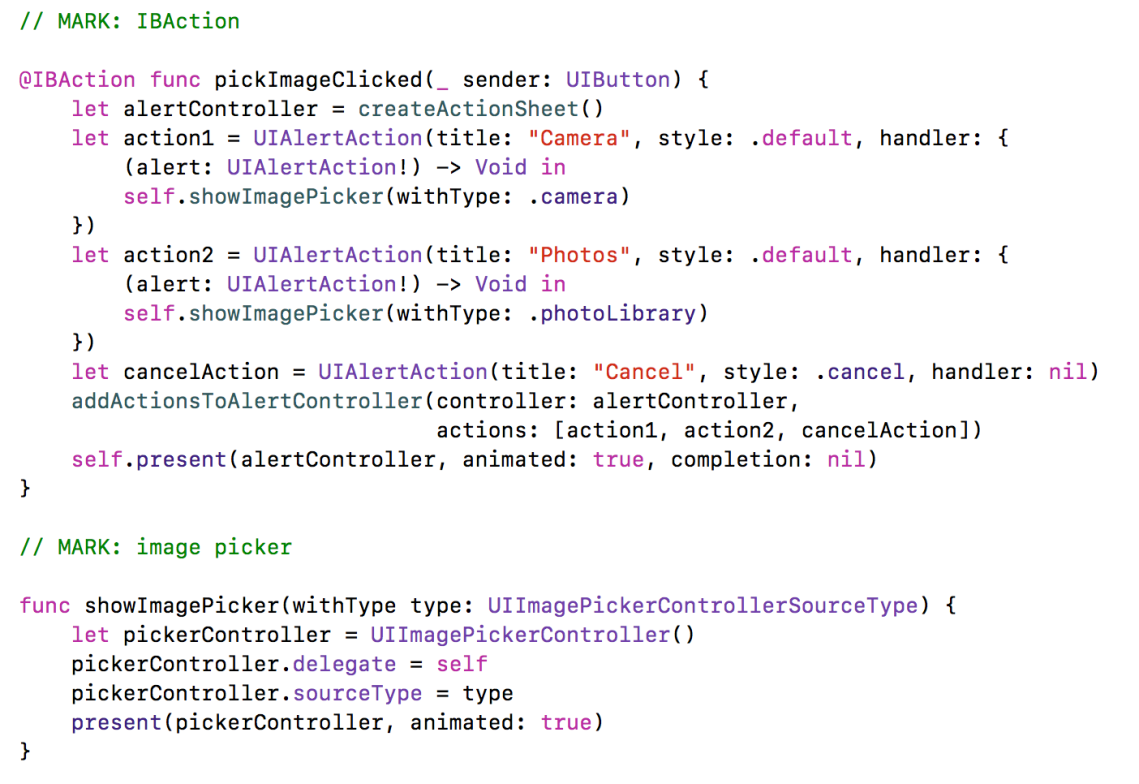
Next, let’s implement the @IBAction of the button for picking image. Here, we will display an action sheet, with two options – picking an image from the photo album or directly taking it from the camera.
When the user picks an image, the imagePickerController(_ picker:, didFinishPickingMediaWithInfo info:) delegate method is called, with the selected image. Here, we will need to first check if the image has the proper orientation (up). Afterwards, we are displaying the image in the image view and we start the text detection.
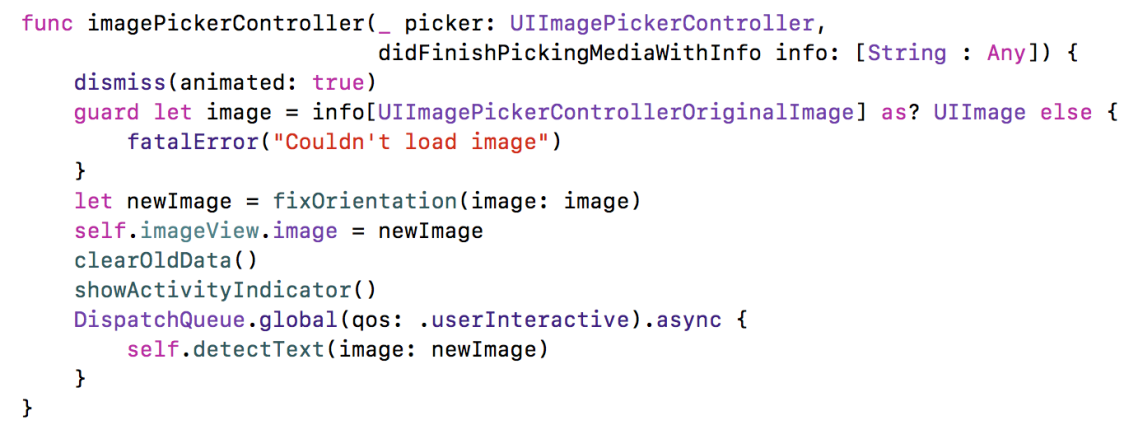
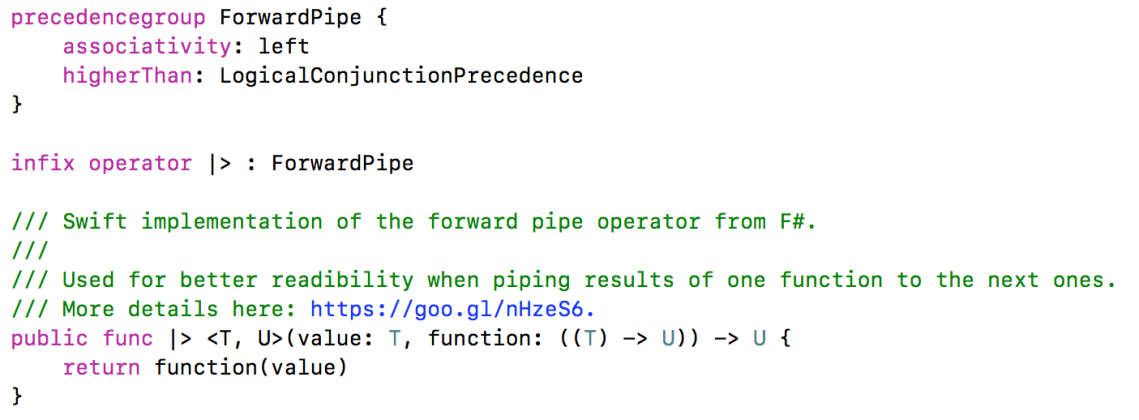
Before we take a look at the detectText(image:) implementation, let’s define the Forward Pipe operator. We will need to process the image with few filters and since these are all pure functions, we can use this operator to make our code more readable.
Now we are ready to look at the detectText(image:) method.
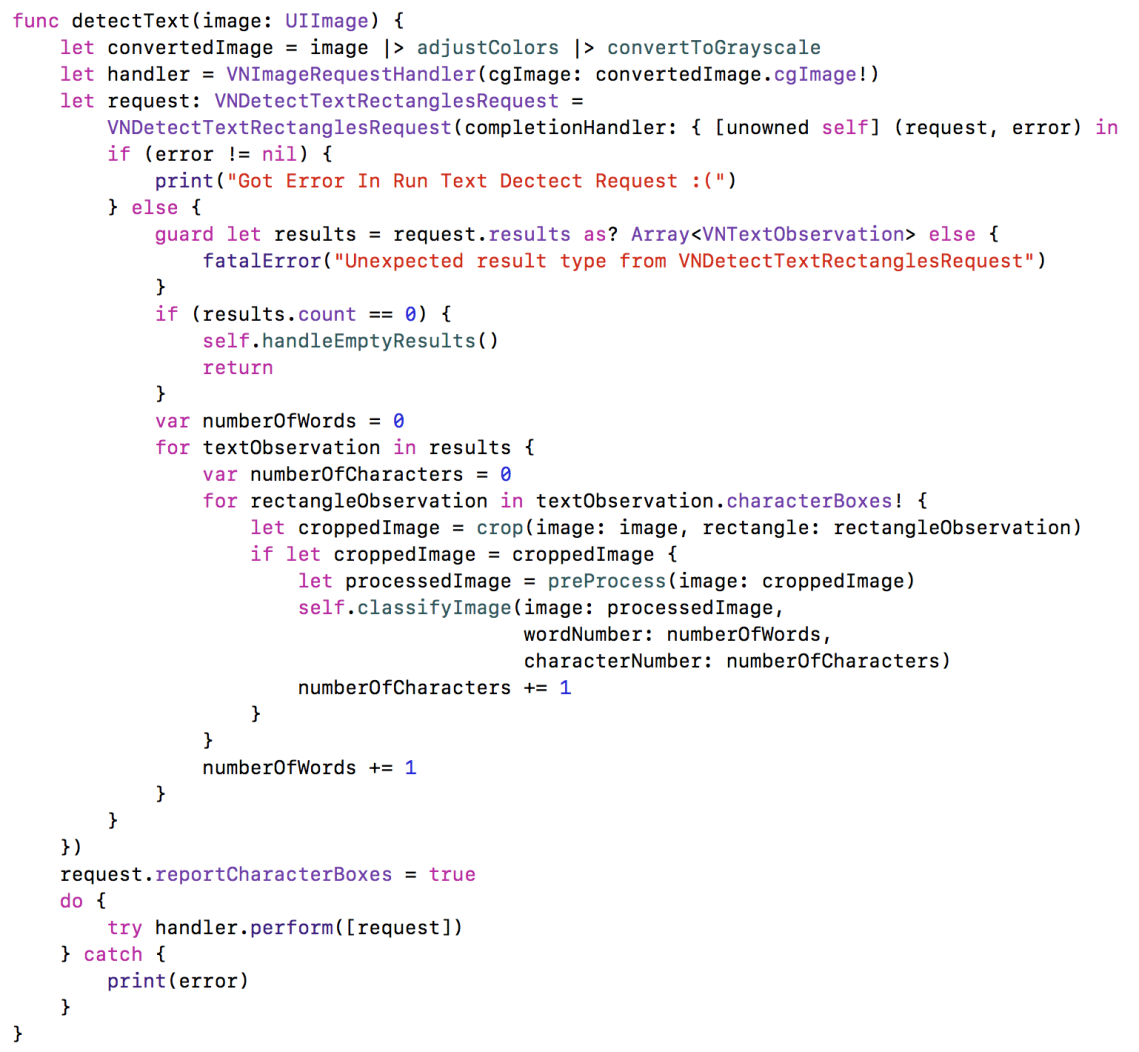
First, we are adjusting the colors of the image and we are converting it to a grayscale image. After that, we are creating a VNImageRequestHandler with the converted image. This class is used to perform requests to the Vision framework. Next, we create a request for detecting text as rectangles, with the VNDetectTextRectanglesRequest. An important note here is to set the reportCharacterBoxes property of the request to true, we will explain soon why we need the characterBoxes. In the completion handler, after the standard error and empty results checking, we go through the found results. These results now are detected, cropped images, consisting of one section of letters or numbers each. For example, all letters in one row will be in one result object. They are objects of type VNTextObservation, which describes a text area detected by the request we have created before.
To get each letter of the detected area, we will use the characterBoxes property. These are the bounding boxes of the individual characters. Now that we know the position of every letter in the image, we can crop the original image to smaller images consisting of one letter. Before we send the image to Core ML for classification, we need to pre-process it first. Based on the training data, we need to insert some padding for better classification. Also, we have to resize the image to the expected 28×28 size and convert it to grayscale. The preProcess(image:) method does that. While iterating through the recognized areas, we keep track of the numberOfWords and numberOfCharacters values, since those will be needed for keeping the order of the images.
Next, let’s see the method for classifying the images. It expects an image that needs to be classified, the number of the word it is contained in, as well as the number of the character in the word.
In the method, we are creating VNCoreMLRequest with the Core ML model we have created at the beginning. We are executing the request with the VNImageRequestHandler. In the callback of the request, we are receiving results (if any), of type VNClassificationObservation. We are interested in the top result. However, you can use the other results as well, if you want to provide the user option to select another one that potentially might be the one they are looking for. Next, we are creating a dictionary with the wordNumber, characterNumber and the classified result. We are sending this dictionary to the handleResult() method.
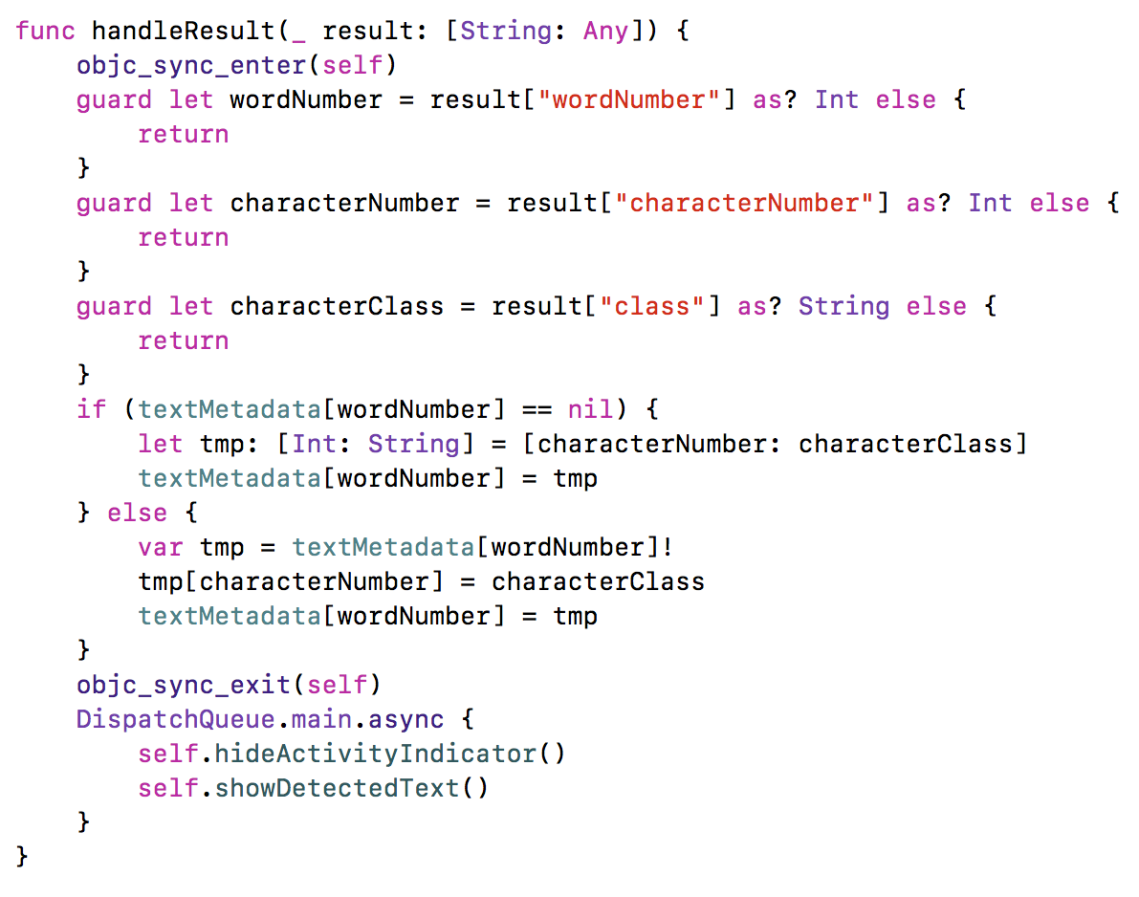
The handleResult method first checks if the required values are in the provided dictionary. Then, we are using a dictionary called textMetadata, which stores all the found words. The keys to this data structure are the numbers of the words, and as values we have another dictionary, with all the characters and their positions in that word. Since the classification tasks are running in background threads, we are locking this chunk of code with the objc_sync_enter method, to avoid any concurrency issues. After we are done, we are taking the main thread, to remove the activity indicator and to display the text.
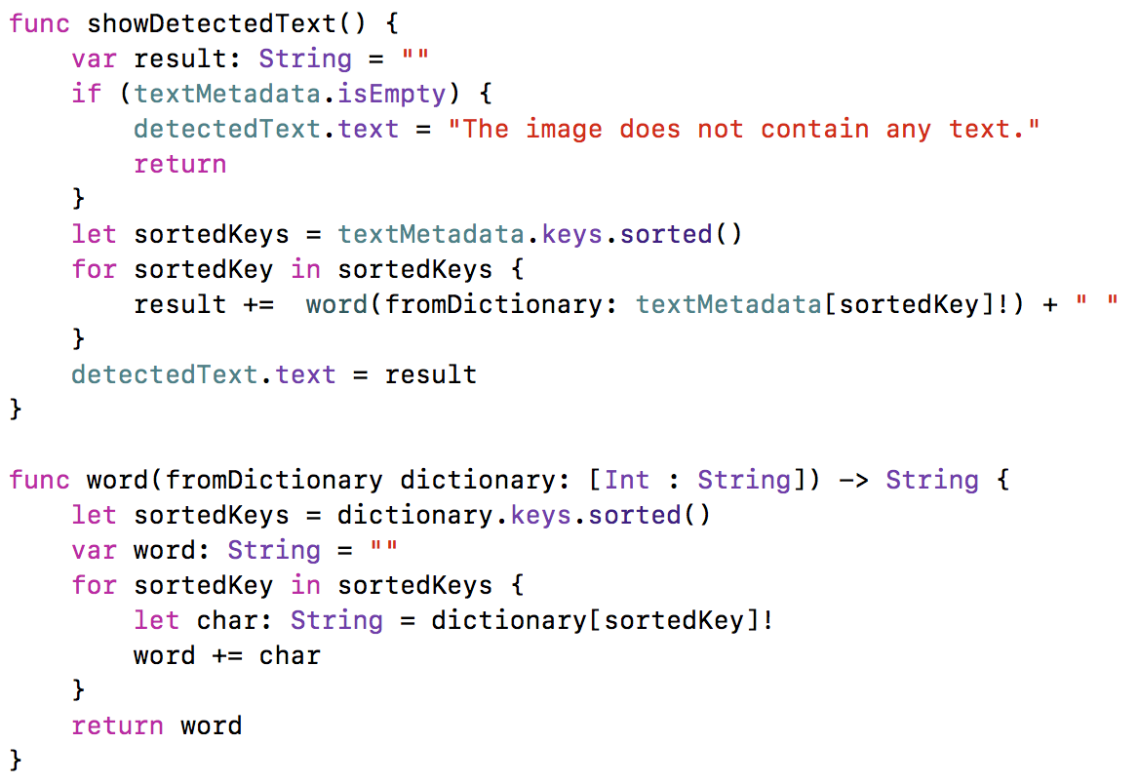
This method goes through the contents of the textMetadata and forms the words, based on the sorted word and character numbers.
That’s everything we need to do in order to have a basic text recognition app. If you run the app and select an image, you will see that the results are accurate in general, although there might be an error in some characters.


One problem currently is that Vision does not detect spaces so well. For example, in the following examples, you can see that it handles everything as one word.


However, if the words are in a separate line, they will be split correctly. There is also room for improvement of the Core ML model. Frequently, it mixes R with B (and other similar letters).
Core ML impressions
The biggest problem with Core ML, is that the models can’t be trained additionally, after the user starts using the app. For example, provided a character is classified as wrong letter, if the user could provide that as an input, the Core ML model won’t be able to learn that and fix it for future similar requests. Core ML only makes predictions on previously trained models, it’s not a machine learning framework itself. Let’s hope that this will enabled in future versions. One workaround would be to ask the user whether a prediction was correct and send that answer to your backend. When you have enough such corrections, you can re-train your model and submit an app update. Not that elegant, but it can be tried out until there is better way.
That also prevents us from providing a customised user experience. If we want to learn the preferences of the users and based on that give recommendations (like for example in a music app), that’s currently not possible with Core ML.
Another issue with Core ML is the size, the more test data you add, the bigger the size of the model. No one would install an app bigger than 100 – 200 MBs.
In any case, Core ML provides iOS software engineers a great tool to get started with Machine Learning. The main role of Core ML currently is to bridge the gap between the academia (that does the process of researching, designing algorithms and training datasets) and the developers (that don’t have much machine learning expertise, but know how to bring production-ready apps to the real world). The framework is still in an early phase and it will improve a lot, along with our know-how of it and machine learning in general.
Source code
You can check the full source code here. You can find more details about the image filtering methods there, since we haven’t covered them in the post.

Wonderful post as always 🙂
LikeLiked by 1 person
Thanks, I’m glad you like it!
LikeLike
Awesome post man and a great sample app, did you create the model or you got it from somewhere else? hope there are more updates for it. And definitely will follow your posts.
LikeLike
Thanks! I’ve created the model with the help of a data scientist. There are also a lot of Core ML models here: https://github.com/SwiftBrain/awesome-CoreML-models. Happy machine learning!
LikeLike
Great post! I would love to see more Core ML posts.
LikeLike
Machine learning on the device sounds cool
LikeLike
Great post! But there is a question: how can I extract the words which have a different color in the picture,and set some space between words
LikeLike
Thanks! Regarding your questions – different color should be handled with the grayscale conversion, so that should already work. Spacing between words is not solved and the problem is that Vision framework doesn’t detect this currently. Solution would be to do some custom computation, based on a spacing threshold.
LikeLike
Please can you share your Model , I have already a train Model in python with a lot of different image for each letters , I just want to see your Model , because when I import my model into your Vision Xcode Project and change the line ” model = try? VnCoreMLModel(for : Alphanum_28x28().model with my model , I have an error that say that the function classifyImage say: Unexpectedly found nil while unwrapping an Optional value” , even if my train model send as you the Classe that he think it is , and the probabilities of the others class.
LikeLike
The model is already on the git repo. Check if you have added yours to the project target.
LikeLike
Excellent work. Your model appears to be better than all others that I can find. Is there anyway I can find the source for the model itself? I would like to build a digits only model for numeric recognition.
Thanks!
LikeLike
Thanks! A lot of people ask me about the script and the dataset, however it’s gone. I’ve made a foolish mistake not putting them on the repo and when I switched laptops they were lost forever 🙂
LikeLike
Hey … now people know it can be done … that provides inspiration.
Is it possible for you to sketch out what sort of training data set you used?
Types of inputs, quantity, etc.
That would help me (and others) get a grasp on the scale and scope of the training that we would need to do.
LikeLike
Hi, I had download the file from Github and started to use it but the result keep giving me different text from the original photo. Any solution or any step to solve??
LikeLike
Hi, I had try to get the correct text from the original photo but I keep getting the wrong text. Do you have any suggestion or solution to solve it?
LikeLike